Page 1 / Page 2 / Page 3 / Page 4 / Page 5 / Page 6 / Page 7 /Page 8 / Page 9
ETex flight test
Propeller and gearbox issues
Loctite issues of pinion fixing
More flight test videos
Instrumented and video flutter test flight
More propeller refinement
Forster 99 bench tests
Forster ignition setup with Marv Stern’s IGN-SW hardware
Uniflow fuel tank fabrication
Wing incidence and performance issues
2008 Champs
ETexaco flying
ETexaco pinion issue
Forster 99 performance and prop issues
Classic Texaco flights and video
Monday 4th August 2008
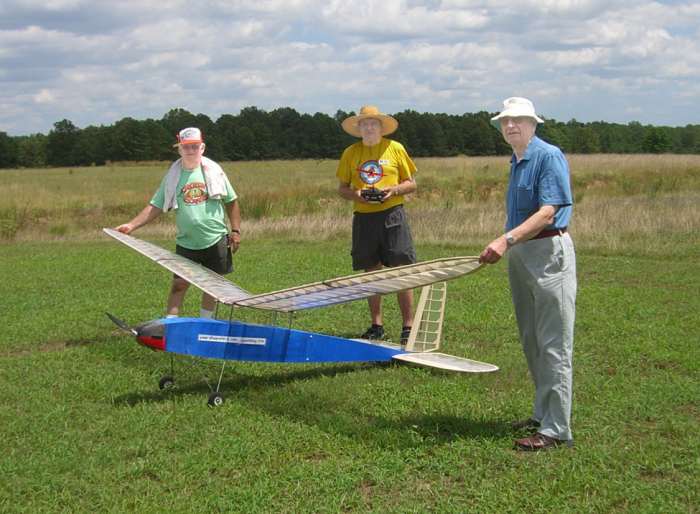
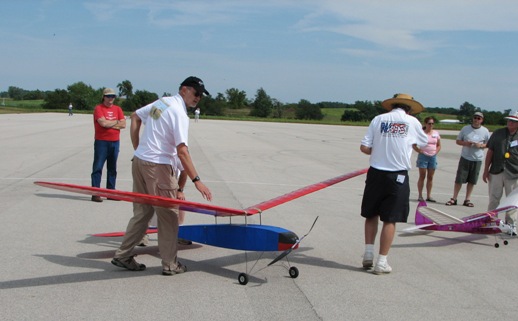
Well we had a pretty good day at the SAM 12 meet yesterday. My Giant objective was to fly with the ETex propulsion system using the 32 cell battery; 4 x 8 cell N1000 SCR cells. I used the current prop from the Stardust Special, a 24 x 22 or there abouts. The weather was a bit iffy for testing; highish wind ~ 12 mph and gusty below the level of the trees which surrounded the whole field. So I flew my Trenton Terror to test the conditions and concluded we should proceed. I expected difficulties in the takeoff as the field is a rough, sparsely vegitated surface, so we planned to push off from the wing tips.
Before flying we tested the current draw while hooked up to just 2 x 8 cell pack. It seemed to indicate pretty good agreement with predictions and was within the motor limits so we proceeded to attempt to fly. The weight, without the wing and stab silk covering should have been about 195 ounces, so a wing loading of 9.8 ounces per square foot.
| Test with two parallel 8 cell packs of N1000 SCR cells | ||
| Measured | Motocalc | |
| Volts | 9.84 | 9.2 |
| Amps | 16.6 | 16.4 |
| Watts | 164 | 150 |
| rpm | 1560 | 1609 |
The first attempt began with both Mick and Chuck pushing from the wingtips as the model would not even move at full throttle. This didn't quite do it but as Mick fell off Chuck moved over to grab the wing nearer the root and managed to propel it almost to flight speed. I controlled it to a flight attitude whereupon it turned slightly towards the spectators, so I set it down. But it was encouraging and we decided to try the same thing but orienting a little away from the spectators. This worked as I managed a takeoff and very slowly gained some altitude. Further altitude gain was subject to the vagaries of the wind, gusts and turbulence off the trees but eventually it climbed into smoother air and I was able to cut back the throttle somewhat, but nowhere near the predicted level of 61%, a 7 amp motor current. On the other hand, the CG was well forward and safe for this flight and I was carrying full-up elevator in level flight. I expect with the CG moved further aft the power required will diminish to the expected level. Mototcalc has not failed to predict the performance of my electric Texaco models in the past. I will continue to add silk to the other surfaces and test fly as weather and flying buddies allow.
We enjoyed our time at the SAM 12 meet and thank our hosts in allowing us to do the test flying from their field. They even awared me a trophy for the meet's most interesting model. I hope I can return when I am ready to fly the Forster version. They are very lucky to have a field in such a remote area as to allow unmuffled Old Timer flying.
As an aside on CG, stability and performance, Lockheed made provisions for CG control in their 1970's L1011 airliner. They installed a fuel tank in the horizontal tail and after takeoff they would pump fuel into this tank to set the CG further aft resulting in a more efficient cruise. A more stable airplane has higher trim drag and therefore lower L/D and higher fuel burn. They argued that the stability required for high altitude cruise was lower than that required for takeoff and landing. Of course they pumped the fuel back for landing.
On the modeling front, our Glider Guider brethren who seek the lowest drag, highest L/D and lowest rate of sink test their models by moving the CG aft and performing a dive test. With a trimmed stable model you expect the nose to rise with speed. They move the CG aft until the model just stays in a neutral dive. Moving it too far makes the model unstable any you must manually correct any deviation from trim or the flight path will diverge to disaster!
Tuesday 5th August 2008
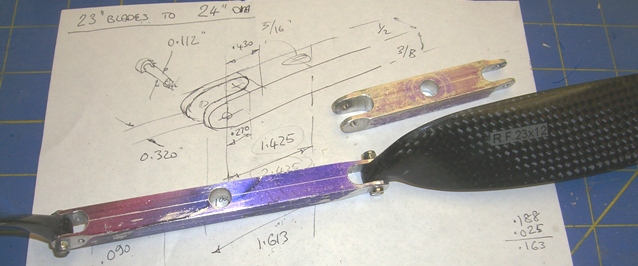
Last night I made a new propeller middle piece so I could fly a 26 inch prop today. With the marginal takeoff and climb performance I need to experimentally determine the best prop, and I will do so by trial and error, time and..... willing. Doing all the math in my head introduces little errors so I am not sure what pitch turned out. I think it is a 26 x 20. I will make another today so I have a range of them. They are surprisingly easy to make with the bandsaw and an angle vice on the drill press. Hooray for an English apprenticeship; years of hand filing...... It was also a good move to buy about 12 feet of 3/4 x 3/8 inch aluminum extrusion from which to make them. A good investment.
Here is the 26 inch prop with the 24 inch prop middle part too.
We planned to fly today after our regular Tuesday breakfast. The test objectives were to examine the performance of the new propeller and the CG moved aft to 50%. The model is easy to assemble and we were quickly ready to fly, but on power-up the prop just slowly windmilled. Examination of the gearbox reveiled that the second stage drive pinion had become loose on the shaft.
This has happened before and since the first evidence of an epidemic is an isolated case, I decided it was time for a better fix. The problem seems to be that the shaft has a flat, which might be useful if the pinion used a set screw, but this one doesn't. It is fixed to the shaft with the usually reliable Loctite shaft fixing adhesive. This stuff is used on the very high power F5B motors. I believe the Loctite in the region of the flat does not provide a sufficiently rigid fix and acts as a failure initiation site with use. I need to fill the flat, so I made up a "key" by grinding away the "shaft" portion of a rod with the same diameter.
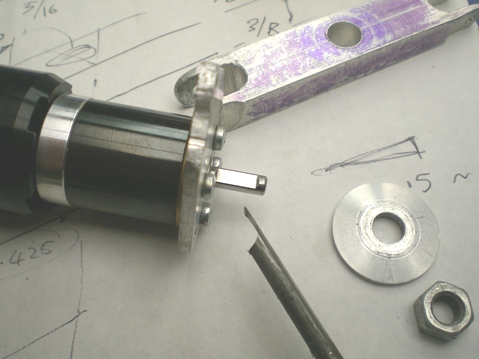
Here is the trial fit of the piece.
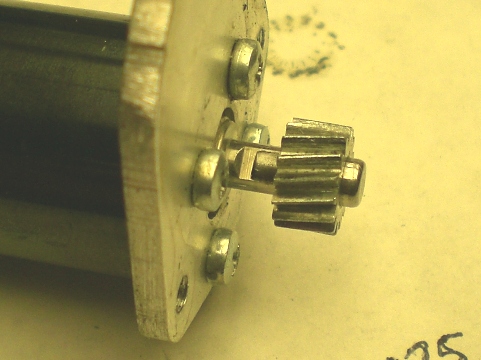
My practice when using Loctite in the presence of a bearing is to build a grease dam to preclude intrusion of the Loctite into the bearing.
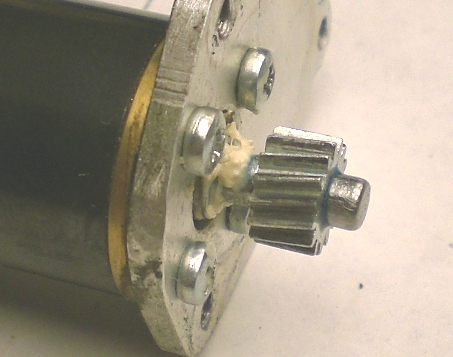
This looks good and tomorrow maybe I can try another test flight. Let's see what the weather brings.
Thursday 7th August 2008
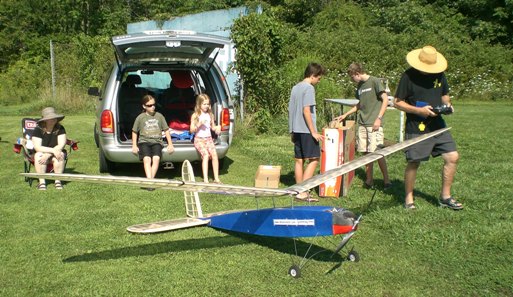
Well we tried to fly with the new prop and Loctited pinion, but no joy. The pinion joint failed almost immediately during takeoff trials. Fun part was taking out our son's boys, the athletes, and my daughter and her kids, less the one at scout camp; the thinkers. We had fun, and we are getting down the process of assembly at the field. Since the SAM 12 meet I have stored the complete fuselage and wing halves in my van. So at the field all we have to do in join the wing halves and attach the tail. It works great and is easy to do.
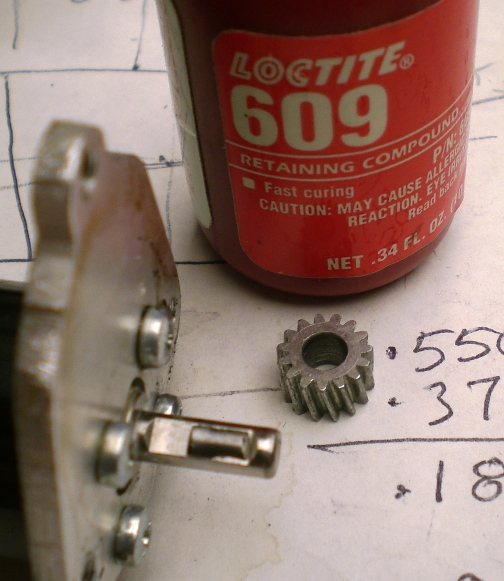
I have researched the Loctite issue and find that I used the wrong adhesive in the recent fix. Here are some of the alternatives;
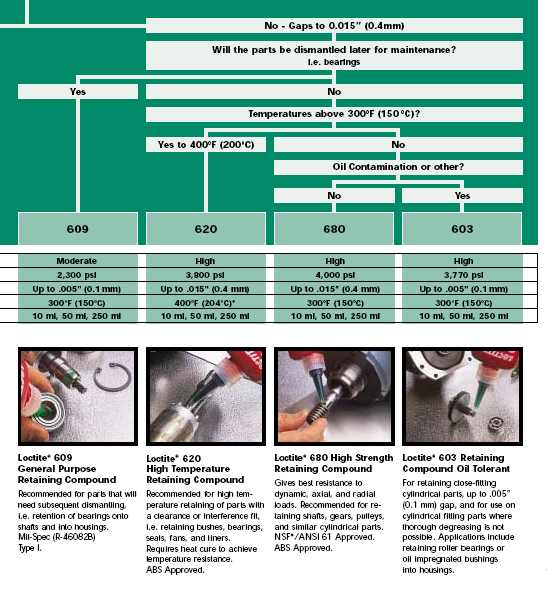
I had used 609 and furthermore I believe the stuff I used had deteriorated with age. I have ordered some 680, high strength material with maybe double the shear strength of good 609, but then I found the model guys use 683 which has even higher strength so I ordered some of that too. I am still not confident that the Loctite solution is the answer. I need more margin give I have had three failures so far. Old flying buddy, Jack Hiner suggests I look at the brake settings for my ESC to ensure is has the soft application setting. I did an initial exploration for that the other day by hooking it up to Castle Creations Castle Link, the computer based reprogramming tool. Unfortunately the CC Phoenix 25 I am using is too old to have the programming feature so I will have to use the old fashioned programming technique using the transmitter. He also advised to slowly roll on the throttle at startup; all good advice. We also discussed some recent incidences where people have lost props in flight; a worrying thought with custom props. I really don't want to buy another set of these Freudenthaler 23 x 12 graphite blades but it might be good insurance for what has turned out to be a fairly expensive (but immensely rewarding) project.
With good weather and stability and trim issues still unsettled I decided to install the high power LMR Neu motor and fly again at this evening's club flying session. I adjusted the CG to about 45% chord. The model performed magnificently with a brisk takeoff and hands off climb and glide and easy responsive control. The horizontal tail control positioning is correctly adjusted with this CG position. It does seem a little unstable spirally though, once in a turn it tends to stay there although with such easy majestic response control is no problem. I will probe further CG positioning but I will wait until I get the silk applied to the aero surfaces since that will change the basic CG.
I am still concerned about the strength and stability of the all flying vertical fin. It seems ok at the speeds encountered so far but you know we have to dive out of a thermal some times. I thought a good idea would be to video the tail while flying at different conditions and last evening one of our young club members offered to let me use his FlightCam2, a device sold by Hobby Lobby; exactly the camera I had been exploring. I don’t need to buy one, just use it one time, so this is a great way to go. It should make some interesting video too.
Sunday 10th August 2008
Yesterday I flew at our Sleighton Field Saturday morning club session. The wind was a little higher than desired and from a direction that produced some turbulence off the surrounding trees. Nevertheless I decided to try some test flights. There were two objectives, first to explore the 50% CG position and the second fly with the Electric Texaco powerplant and prop. The first flight was made using the big Neu motor from the LMR airplane. The flight went well although I think either I am approaching the aft limit or I didn't have sufficient nose down trim available. It was mushy and a little reluctant to turn, sort of sitting tail down. Spirally it was perhaps even more neutral to unstable although the response frequency is such that control is no problem. The air was kinda gusty so not good for textbook test flying, on the other hand, response to this kind of air is important too. We don't have complete freedom to pick our air in a contest.
Next I tried the newly fixed ETex propulsion system, this time with the big NeuEnergy two-cell LiPo battery, so at low wing loading. We made several push-start attempts without a real takeoff and in one such event the model rose up, rolled a little and settled onto the horizontal stab. A couple of subsequent tries resulted in a significant pitch-up and on close examination the horizontal pitch angle was noted to be more nose-up that expected. Further examination revealed the control horn to have partially separated from the stab; a weakness of concern when I made it. So quit for the day.
However, after an excellent beer and an afternoon nap (to think things out, you understand) I was motivated to fix it. The horn is held in by two screws;
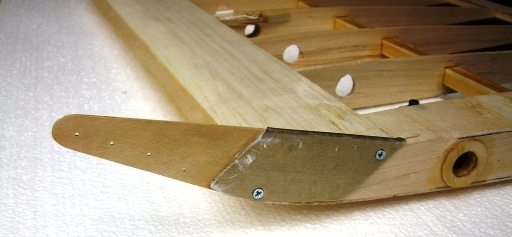
The screws are driven into dowels which in turn are glued to local structure. These are tiny screws! The failure was pull-out of the leading screw with attendant damage to the dowel and leading edge. This could be pushed back into place as the failure was entirely splitting of both balsa and hardwood so I just pushed it back and hit it with thin CA glue. This wicked into the damaged area and made a good fix, but it was no stronger than before; what to do?
I was thinking about gluing a thin ply doubler to the root rib then adding more fasteners when I thought it would be just as strong if I just CA'd the horn to the root rib. The loads after all are pure shear in this joint and the follow through structure is sound enough. Furthermore, there has to be a weak point and I would rather have subsequent damage to this visible area than the splines of the servo.
Now I had the hots to try the ETex powerplant again so as to clear the flight cards for the week. Could I rustle up enough help to push this thing at our small local Christian Academy field? Yep, I found somewhat willing "volunteers" in son-in-law and two grand kids. We only had about an hour of daylight remaining and the wind had dropped; which is good news and bad as you have to push this thing up to flight speed on grass runways.
We made our first attempts again with the LiPo battery but there was just not enough power to gain takeoff, so, despite the additional weight of the NiCad pack, about 40 ounces, I thought the additional voltage would do the trick. And so it was as the second straight attempt resulted in an excellent flight. Takeoff and climb was made at full throttle but it was possible to significantly reduce throttle once the model climbed above the turbulent ground layer. It flew for ten minutes or so until I decided to bring it back. My flying buddy Jack Hiner reminded me to be careful flying very big models as you tend to think they are closer than they really are; sometimes resulting in embarrassing events like landing in the adjacent field or worse; in the trees. I was mindful of Jack's advice as I brought it in but still flew too close to the surrounding trees for comfort. However this model seems to maneuver well and eventually I will be more comfortable flying in our small fields.
The errant dog was a real concern but the model was saved by a twitch of the horizontal tail just as he was getting really interested.
Now to add the silk to the rest of the model, make a more effective and stronger tail skid (the horizontal tail is lower than the fuselage bottom and on grass it is the element that touches first with the current tail skid.
Further flying is in order particularly to sort out the optimum propeller but having to launch with two coordinated pushers is a bit daunting and I may run out of enthusiastic grand kids before the test cards are finished. Maybe it is time to buy some more advanced instrumentation so I can measure current with different props. Hey, club buddy Jim Barrow is morphing into an electronic hobby from flying and he is developing just such a device. In fact he was ready to test fly it on Saturday. Also I have to fly the tail flutter tests but I can do that with the big motor and no help.
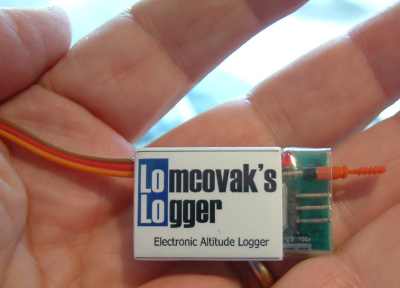
Just had another thought about establishing the optimum performance and propeller. I have the instrumentation I need so long as I can fly in "test flight" still air. I have a recording altimeter and I can measure the battery consumption and flight time.
All I need to do is;
This should give me a good deal of data to compare to Motocalc predictions for motor, climb and descent performance. If I can make that correlation then I can make assertions about cruise power and cruise flight duration. Repeat with different props and I should gain a good understanding of what works and why.
Still have to make takeoffs though, and I have been wondering about hi-start bungee assisted launches or maybe even tow launches from my son's scooter. Trouble with these approaches is time to develop the stuff and the risks involved with tow line separation. Maybe I will stick with the human powered approach till I find it doesn't work any more.
Actually, I think I will only need four flights with different props if things are consistent. And I suppose I could fly till battery exhaustion and get the real flight times but that means really long flights (I hope!). But wait, I am flying with four packs in parallel. If I fly with only one pack the performance will be down a little due to the higher internal resistance but the flight time will be short ~ less than 15 minutes. And I will have four packs on board so change the prop and fly again. Better get started on making some more prop middle parts.
Sunday 17th August 2008
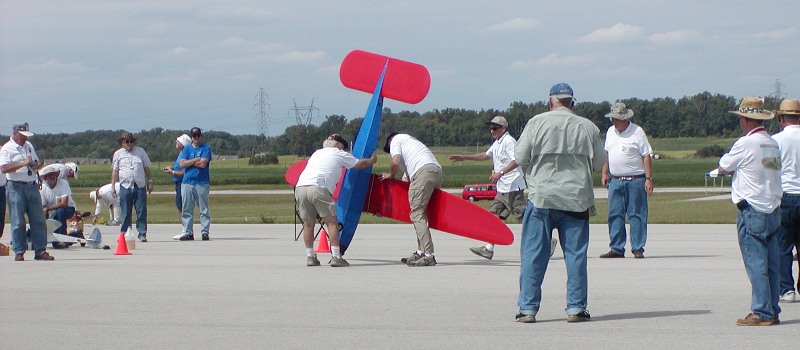
It has been a busy and puzzling week of development and analysis. On Tuesday night last, at the mothly Propstoppers/SAM76 club meeting I flew with the NiCad configuration for a full battery exhaustion flight. Takeoff was with a push start by the wing tips and the flight was unevenful. Duration was only 26 minutes vice almost 40 with my Stardust Special. But it is early times in the deveolpment process.
So I continued with further analysis. I had flown with a 26 x 24 prop, but it seemed to suggest a bigger higher pitch prop so I built a new middle part expanding my 26 inch prop to 28 inches with twist to achieve a 28 x 26. Of course the bigger the prop I make with the Freudenthaler 23 x 12 blades the further I depart from ideal prop geometry. I will do some more analysis on this later, but in the meantime I made some more test flights with this prop achieving more dissapointing results. It flew for 22 minutes. The only good part about this test was I learned to push start the model by holding on to the tail end of the fuselage, like a wheelbarrow.
I then began to examine the details of the Motocalc analyses and saw some curious things. So I decided to go back to fundamentals and do a simple analysis. It seemed to me the key was in getting the prop pitch right for the cruise flight condition and fiddling with the diameter to get the optimum. The Giant has an L/D of about 12 so at 12 pounds AUW the required thrust is one pound. Flight cruise speed is about 13 mph or 23 ft/sec. So for a given prop diameter you can calculate the inflow velocity. If you know, or can estimate the rpm and with a prop section angle of attack you can calculate the required pitch.
I measured the rpm with the 28 inch prop at about 1350 at full throttle and from the flight throttle setting I measured 1200 rpm. Using these numbers I estimated I needed more pitch than I used in the earlier flights. I estimated what turned out to be a 28 x 30 and this I built using a new technique. I had bought two different bar stock aluminum pieces from which to make prop middle parts. The first two I made from stock thick enough to accomdate the twist by cutting it into the part. I realized that the smaller cross section matched the original stock middle parts and I could make new ones by cutting the untwisted yokes into the part then twisting it to achieve the additional pitch. So with the really steep pitched 28 inch prop I made another test flight, this time requiring extra effort from my two-man (grandsons) push team as I couldn't wheelbarrow fast enough. Also the prop clipped the grass slowing everything down, but if flew and cruised at a very low throttle setting but no joy as the flight was only 19 minutes on a battery that had been charged twelve hours previously. So I still have a performance problem and don't know if it is in the propulsion efficiency or the airframe aerodynamic performance. I failed to get the altitude logger to record the flight data.
So I decided this morning to make another flight using the high power motor and LiPo battery, but retain the 32 NiCads as I wanted to measure the glide performance at the higher gross weight of around 200 ounces. I added the seven ounce LiPo and two ounces of logger and separate AAA battery to the nose compartment so the CG moved forward to about 45%.
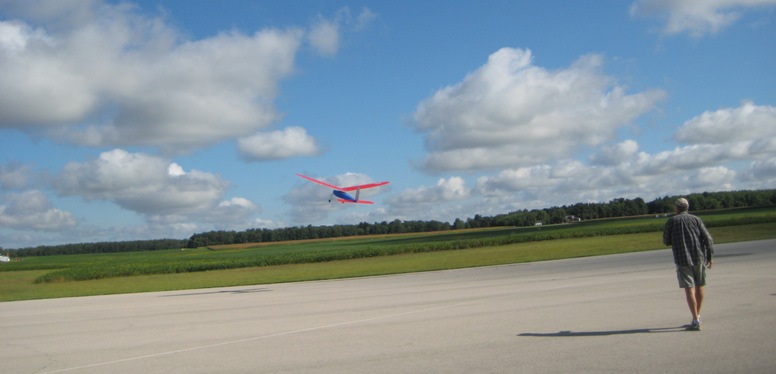
Here is the flight and the data from the altitude logger, shown separately here.
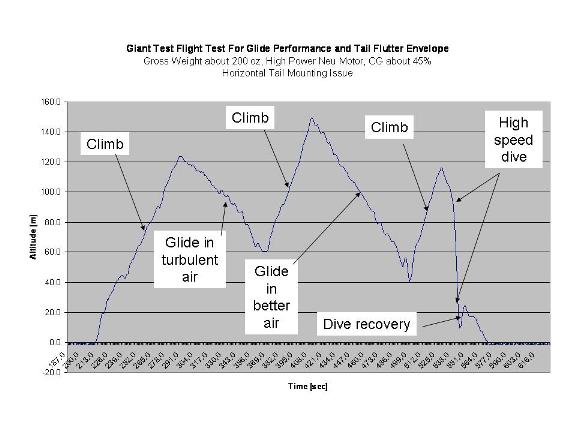
As you see in the movie the glide tests were dissappointing, but the tail did survive the dive flutter test. So more investigation is necessary on both airframe aerodynamics, currently a mytery, and the propulsion efficiency via more prop testing. Maybe the good old Freudenthaler 23 x 12 blade is woefully off at the large size and high pitches I need. Time to build new blades? Ugh!
Monday 1st September 2008
I haven't posted for two weeks, but that is because I have been very busy flying and troubleshooting the Giant and other chores. And I have been disappointed in simply not achieving the expected results. The performance is not as good as expected at this point although I had a magnificent 50+ minute flight at our club picnic; mostly thermal aided of course. Flights in relatively still air have been conducted to evaluate both ETex power systems, the two-cell LiPo and the 32 cell NiCad, both with variations in the basic propeller using the Freudenthaler 23 x 12 blades. Flight tests take place when I can rouse up two willing grandsons. But test flying is best in the early morning and getting grandsons out of bed during Summer holidays is rather difficult. At least two launches have been made by the wheelbarrow mode; pushing from the tail like Brad Levine did at the LV Champs. Indeed the 50 minute flight was initiated by fellow SAM 76 member, Chuck Kime, who sacrificed himself with a magnificent launch, ending for him in a face-plant!
I have since made more careful measurements of the Freudenthaler blades and done some more fundamental analysis of propeller requirements, particularly the pitch required for efficient cruise. The analysis takes the assumed flight speed and airplane drag at that speed to calculate first the induced flow and then the true helix of a zero angle of attack propeller. To this I add a desired angle of attack resulting in a desired propeller pitch distribution. For the test propellers I set the pitch at 75% radius to this desired number. I was surprised that the home made propellers have pretty decent pitch distribution using these blades. Here are the results for the LiPo and NiCad configurations. The rpm values were measured statically first at full throttle then at a reduced throttle corresponding to the settings I believe I have experienced in testing. Not accurate but decent estimates.
| INPUTS | fps | |
| Flight Speed mph | 15 | 22.00 |
| Prop Diameter | 28 | |
| RPM | 882 | |
| Thrust required oz | 16 | |
| Desired angle of attack at 75% rad. | 7 | |
| Prop disk area ft2 | 4.28 | |
| In-plane speed @ 75% radius ft / sec | 80.8 | |
| Prop section airspeed ft/sec | 83.8 | |
| Inflow induced velocity fps | 4.4 | |
| Zero lift helix ~ degrees at 75% radius | 17.4 | |
| Prop pitch angle at 75% radius | 24.4 | |
| Middle part twist to achieve this | 13.50 | |
| Prop helical pitch ~ inches | 30.1 |
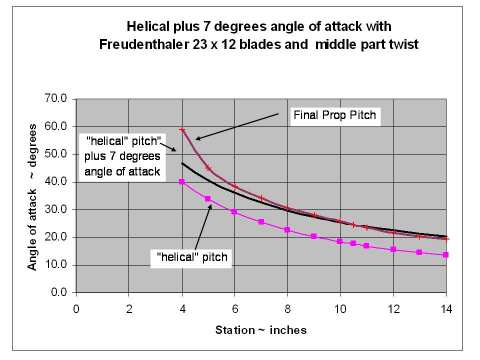
As you can see the match is very good, even with a little wash-out towards the tip.
Here is the same analysis for the 32 cell NiCad configuration. The rpm is higher with the higher voltage.
| INPUTS | fps | |
| Flight Speed mph | 16 | 23.47 |
| Prop Diameter | 28 | |
| RPM | 1000 | |
| Thrust required oz | 16 | |
| Desired angle of attack at 75% rad. | 7 | |
| Prop disk area ft2 | 4.28 | |
| In-plane speed @ 75% radius ft / sec | 91.6 | |
| Prop section airspeed ft/sec | 94.6 | |
| Inflow induced velocity fps | 4.2 | |
| Zero lift helix ~ degrees at 75% radius | 16.2 | |
| Prop pitch angle at 75% radius | 23.2 | |
| Middle part twist to achieve this | 12.00 | |
| Prop helical pitch ~ inches | 28.4 |
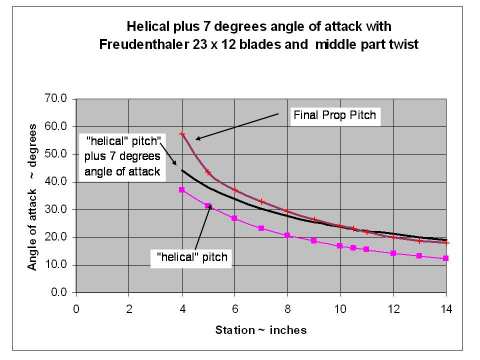
Also not bad and including a slight wash-out at the tip. How about that, a square prop; 28 x 28 Don't they always work out that way once you have them sorted?
The results of all this testing and analysis is the LiPo configuration does not fly, at least it has insufficient performance to climb out of the ground turbulence layer. I have abandoned this configuration at this time. The NiCad configuration at 200 oz and ten ounce loading flies just fine, at least in terms of takeoff (assisted on grass) and climb out. I have not however made a competitive still air flight. The best so far, the early flight at our club meeting where it did 26 minutes vs. a target competitive flight of nearer 40 minutes. I still don't know why I am not achieving the expected performance, but time is up for further development for the SAM Champs in Muncie a week from today. For the ETex event I will be prepared to fly it if the weather looks like it has good thermals otherwise I will fly my trusty Stardust Special and concentrate on the ignition events with the Giant.
On the 50 minute flight I had some difficulty in seeing the model at an altitude of about 1500 feet. This is because the wing and tail was till only covered in the transparent and uncolored Doculam. I did not want to apply the silk and add about a pound to the empty weight in case I got the LiPo configuration to work and now I have run out of time to do so for the ignition events so I decided to spray paint them and recover later.
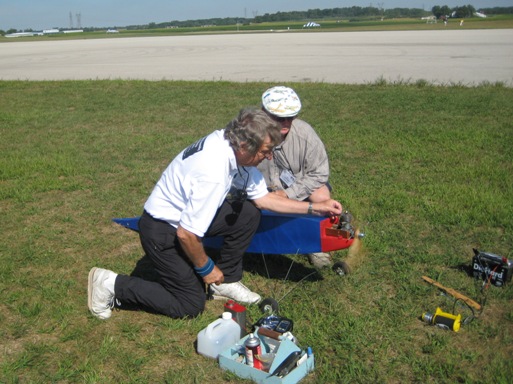
Meanwhile I have begun to get the ignition engine situation sorted out so I know the Forsters run etc. In this I was aided by fellow SAM 76 member Ed Goretzka and his friend and SAM 100 member Don Koch. Don loves old ignition engines and is well prepared to set them up and run them. A few months ago I sent him Mike Myers' Forster, a RJL replica loaner. The engine had not been run and Sal Taibi had told us they could be a bear to start until the rings were bedded in. This proved to be untrue for this example as it started and ran right away. Four tanks were run through it with starting never being more that a few flips of the prop.
This time Ed and I took six different Ohlsson 60s and the Don Bekins Forster for an all afternoon running session. The Ohlssons all ran fine so I am set with the engine for the Bomber in Ignition Texaco, but the Forster proved fussy for a while, eventually putting in a solid run at 6200 rpm on a 16 x 6 prop. We could not repeat this run but Don thought his ignition system may have been getting weak at this point. I will try to repeat these tests in my yard before deciding which Forster to install in the Giant.
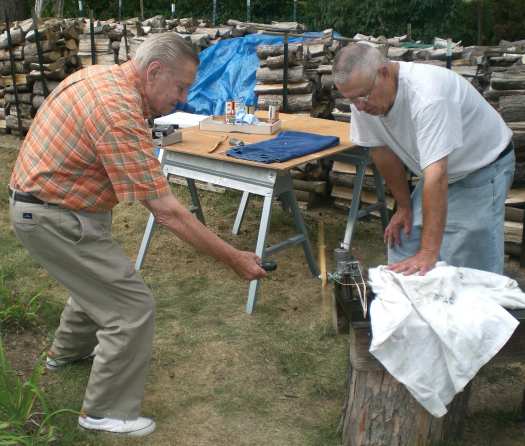
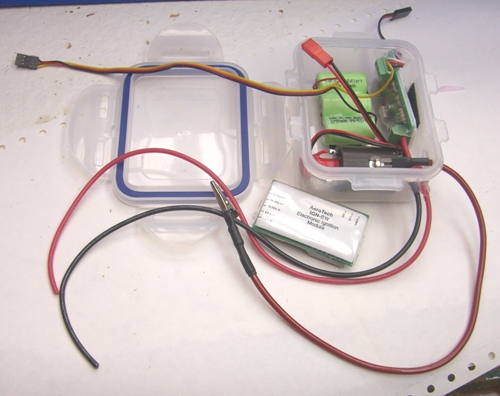
Now I have to make a fuel tank and assemble the ignition system. For testing Don installs his complete ignition system into a small plastic box with a big ON OFF switch on the side. In the above picture the ignition system box is under the rag that Don uses to keep the oil out! I think I will do something like this for the Giant as there is abundant room in the forward compartment and I can remove the whole thing for ground testing; a great way to ensure things work on the bench and in the airplane. I will be using one of Marv Stern's IGN/SW control devices. This unit combines and electronic ignition switch with the transistor all interfaced to the radio. If the radio is off or loses signal the ignition is switched off. A sure way to avoid those occasional takeoffs we see where the flyer forgets to turn on the radio at launch.
The Giant wings and stab are finished, painted and in the box. Only the ignition setup remains for the fuselage before packing.
Wednesday 3rd September 2008
Accomplished several things in the last few days. I have been working on the Forster installation including fuel and ignition systems. I was quite taken with Don Koch's ignition "box" and although he uses his for bench running I realized I could do the same and install it into the Giant if I could find a small enough box. I did and have now completed much of that part, just need to terminate the points and engine ground wires to finish up. I am using one of Marv Stern's IGN SW switch and ignition devices. In this picture one is installed in the box and the other is a spare that I may install in the Bomber.
I made a tank for the Giant.
Haven’t done this in a long time, but, as they say in England “needs must”. Not sure what it means but it seems to apply to my situation. Classic Texaco rules allow for 4 cc’s of fuel per pound of model weight and in this form the Giant will weigh twelve pounds, so I am allowed 48 cc. The event rewards long efficient engine runs so it is good to ensure the fuel feed is even throughout the run. If you just chuck fuel in a tank the mixture will vary throughout the flight, starting rich and slowly leaning out as the carburetor has to draw the fuel from the reducing level. In U/C racing we suffer even more from such effects as the fuel head is affected by the centrifugal force acting on it. Nevertheless you still see it in RC and freeflight so I am applying a common U/C fix by using a Uniflow tank.
Furthermore, it is advisable to make a tank to the exact size allowed for the event so you can easily fill with the correct amount by completely filling the tank. Otherwise you must drain the tank then fill it with a pre-measured amount; a messy and time consuming process. When the engine is hot and tuned you just want to stop it, fill the tank and go. So I dragged out the .005 inch brass shim stock and laid out a tank.
I usually design a tank with a simple geometric shape that allows easy volume calculation. The volume usually turns out fairly accurate to the intended (although this time it turned out oversize and I had to squeeze it down to size!) I make them from sheet brass shim stock, it is easy to cut and solder. One feature that is important to me at least, is to make the feed tube and exit port as a unit in the lower corner. Normal tank design has a feed tube that dips into the lower corner. This approach does not guarantee that every last drop will be drawn and the last dregs are subject to a combination of fuel and air.The uniflow tank principle is depicted below. The tank has a feed from the bottom and two vents; one dipping to the tank bottom and the other just at the top. The tank is filled through the deep vent allowing the air to displace through the top vent. Once the tank is full you cap off the top vent.
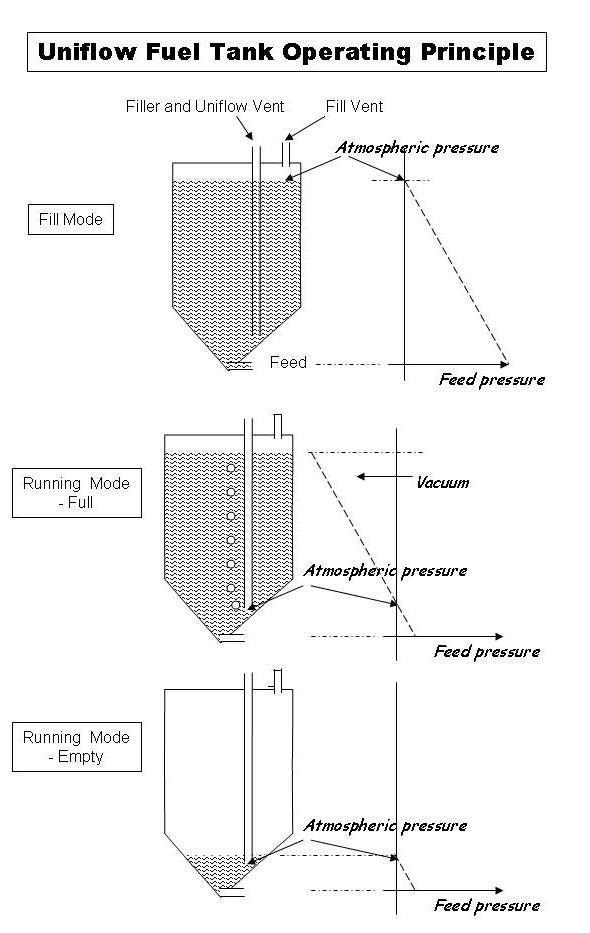
Now when the engine begins to run its carburetor “sees” the fuel pressure arising from the head of fuel. But as the fuel is depleted the pressure drops as the carb sucks against the closed vent. It pulls a “vacuum” until the pressure drops and venting is sucked through the lower vent. This condition remains until the tank is close to exhaustion and the fuel drops below the lower vent. So, the engine sees an almost constant fuel head or pressure during the whole run.
Here is the tank I built for the Giant. I made it from a band around the girth and two end caps. The feed tube is soldered to the outside bottom and I file between the tank wall and the feed tube to create the “drain” hole as shown here.
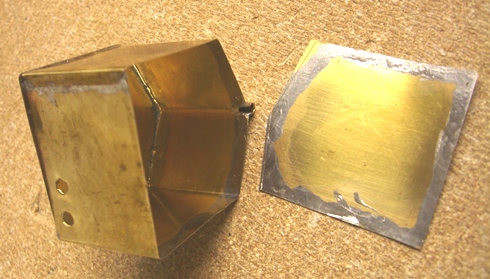
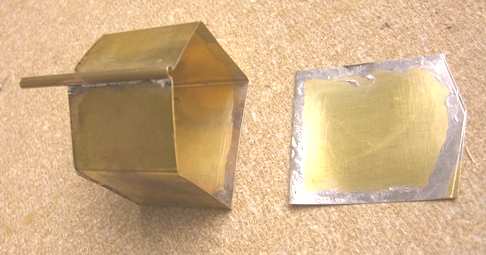
The components are tinned with solder at the location of the joints then soldered together. The vent tube holes are punched into the surface so as to provide a collar to make the joint stronger. Finally the tank is leak and volume tested.
Then a fit check is made to the final installation place. The vents will protrude conveniently next to the needle valve because you must close the top vent with a plug once fuelling is complete. I will glue the tank to the engine mount structure with silicone adhesive, an old U/C trick. This provides a mount that does not have the stress raising effect of a mechanical mount and a degree of vibration suppression. It also provides some stiffness to the tank structure which otherwise is a rather fragile thin shell. Here is the installation fit check.
This is the RJL Forster replica loanded to me by (former) SAM President Mike Myers. I have removed the tank so I can feed from the uniflow and I have removed the exhaust stack because it is different and larger than the stack on the original engine. I don't want to cut any more of the cowl away so if I use this engine I will probably make another stack, like the original. That unit is circular and I am rather taken with the idea of using an exhaust extension to keep the oil off the silk finish. The silk is somewhat heavier than that normally used in these applications and I am concerned that I have not applied sufficient dope to avoid oil being soaked in. I don't want to add the weight of a comprehensive fuel proofing all over the fuselage. Meanwhile I have coated the engine mount and engine compartment with epoxy laminating resin, that I just had on the shelf for years and years. It was quite thick and in hindsight I wish I had thinnned it. However, I expect this part to keep the oil out for a while.
I had quite given up on the performance front, in particular the glide performance. I just don't understand how an airplane with these attributes does not have a magnificent glide. Yes, you can be fooled by a big airplane and misjudge its speed. I saw my first 747 takeoff at Boeing Field in 1970 when they were delivery testing the first JAL plane. I almost shouted out loud that it was going to stall! We judge speed in terms of lengths traveled per unit time and big things seem to move slowly. But go back and look at the movie of the Giant landing and you will see that it is acutally moving quite fast. On the other hand, every time I have made a takeoff, either with non athlethic grandsons or single wheelbarrow pushes by individual mature SAM members, I have been able to push the stick forward to assist in the roll out then pull back and climb away, at least initially. It seems to me that these "launches" did not reach the flight speed of 15 mph or 23 ft/second, so how did it take off?
Over the last few days I have discussed these issues with flying buddies and a) PhD phyisicist Dick Barkkowski and b) Senior Boeing Aerodynamicst Colin Widdison. Colin's observation is that the takeoff was, of course, in ground effect, so the induced drag was low even when I pulled maximum Cl. So that seemed to explain why the takeoffs at low speed were satisfactory.
As I sat staring at the fuselage on the bench ready for ignition engine installation I realized that the cabane, although adjustable, was set parallel with the fuselage, so the fuselage was certainly not aligned with the airstream in cruise flight. Consequently the fuselage drag is substantially higher that if it were. The fuselage is 8 1/2 inches square with sharp square corners. Here is the Cl vs. angle of attack data for the airfoil, notice that the zero lift incidence is minus three degrees. This means that with the current cabane geometry the wing is at three degrees angle of attack with respect to the fuselage. But the likely optimum flight angle of attack is about seven degrees so the fuselage is "flying" at four degrees nose-up; not good.
So I have re-set the cabane within the current hardware capability to an additional three degrees nose up and adjusted the horizontal tail by the same amount. Now with a little smoke and mirror action I could "estimate the upwash into the wing at one degree so the new cabane alighnment will completely solve this problem!!! Yeh right! Well, if the geometry is right the aiplane was flying with the fuselage five inches nose high w.r.t. the tail. Might make a difference.
The final preparations for our trip to the SAM Champs in Muncie include making fuel. The first step took me on a trip in and out of the parallel universe, you know, the place that things slip into when you just put them down. A while later they slip out again and there they are, just where you were looking for them. In this case it was a quest to find the gallon of SIG castor oil to make the fuel. I knew exactly where it was kept in the garage, only it must have slipped out. This time it didn't slip back and I have absolutely no idea where it may be! Hmmm... now what to do? Well, Doug Koch said he uses SAE 70 motor oil at 3:1 with gasoline. He also said that 70 weight is hard to find. My recollection from SAM Talk discussions is that Harley Davidson still stocks this oil so that is where I started. What a trip, talk about parallel universes, this is another world largely populated by old fat guys with the same uniform. Anyway, they no longer list 70 weight oil but the do list 60 weight. Guess they have made some improvements in the 1923 technology.... but not much! But they did not have any in stock so I looked elsewhere. Flying buddy Chuck Kime, a former bike racer suggested I try the local Speed Shop and that worked just fine. Again, no 70 weight although he thought that Kendal still made it, but he did have Pennsoil 60 weight and I bought a quart of that. Now to the gas.
Doug uses a no ethanol unleaded from a Gulf station, local to him but 60 miles from me. So I did some internet searches to see where the ethanol tainted fuel is mandated, or where I might buy some with out ethanol either locally or on our way to Muncie. No dice, maybe the first failed internet search in years. I wondered what the ethanol would do to the Forsters, probably no much as I could run them on methanol but I wanted to minimize the changes from Doug's testing. Mick then reminded me that Coleman stove fuel was sometimes used and that should be widely available. So I did some internet searches on Coleman Fuel and Stove Fuel. Amazing, another failed search process. A gazillion hits on Coleman stoves even at such places as KMart and Target, but no fuel listed. My best result was stove fuel listed at REI. $8 per quart and a 30 mile drive didn't sound like a necessary adventure so I put that aside. Then, as the last thing I did on Saturday evening, after going to the bank for some cash for the Champs trip I thought I would just swing by the local KMart, just down the road. Whoa, what's this? A gallon of genuine Coleman stove fuel for $8; a strike if ever there was one. I can only conclude that it is not advertised because the terrorists would know where to buy it! So with everything in hand I packed the van ready for an early start.
Sunday 14th September 2008
The SAM Champs, Muncie Indiana, at the AMA Flying Site
I didn't get the chance to fly with the wing incidence change before the Champs but since the first event for the Giant was on Tuesday I would have an opportunity to fly it sometime Monday.
Flying buddies Dick Bartkowski and Mick Harris drove with me to the Champs, and easy one day ten hour drive arriving on Sunday afternoon. Chuck and Tina Kime drove separately and Colin Widdison flew in from Seattle to make up our SAM 76 crew for the week. The weather forecast for the first four days started iffie but in the event we had four wonderful days at the beginning of the week and plenty of warning that Friday might be a washout. Mark Petrolia, the RC CD announced that Friday events could be flown on Thursday so we had a clear shot at completing our planned competitions.
Our Monday event was Limited Motor Run and although I briefly considered fitting out the Giant for this event I quickly abandoned the idea as I would have to buy a very expensive motor to handle 160 amps for 90 seconds! No, the big Stardust Special is perfect for this event so that is what I flew; two quick flights to score two maximums and wait till the flyoff in the afternoon. Now there was plenty of time to assemble the Giant so in the afternoon I attempted the first test flight. This didn't work out so well because as I released the model a wind gust picked up the left wing and the model rotated around the nose and fortunately was caught by Steve Roselle who was steadying the right wing for takeoff.
Tommy Gray photo
The result was damage to the motor mount and scuffing to the prop blade leading edges. This mount damage was similar to that experienced during the phantom wind gust at the Walt Bryan fun fly and was again easy to fix. This picture is after the Walt Bryan meet. The motor is fastened with two screws at the front flange to a soft aluminum mount and tie-wrapped to a yoke at the rear. The side impact caused the tie-wrap to break and the front mount to bend; easily fixed. The damage at the Champs was similar.
I sanded the scuff marks out of the prop blades and we were ready to go again but had to wait until completion of the LMR flyoff as I was using one of the same NiCad batteries in the Stardust Special.
So, after the formal flying for the day the wind dropped and Ed Hamler encouraged me to try a test flight which I did. This time it was a copy book flight except for Chuck Kime falling on his face again at launch, this time landing on the macadam surface with painful results. But the launch was magnificent and the model flew perfectly. Even the trim was right, a fortunate situation as I had eyeballed the change in setting for the horizontal tail control linkage to match the wing incidence change with the cabane.
Mike Myers photo
After almost twenty minutes I just decided to land although I hadn't verified improved performance with a timed flight duration, it just felt good and I decided this is what I would fly in Tuesday's Electric Texaco competition.
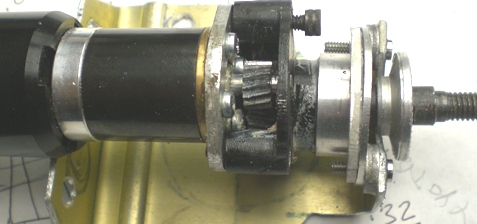
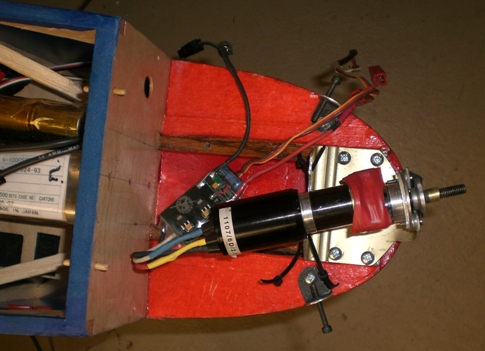
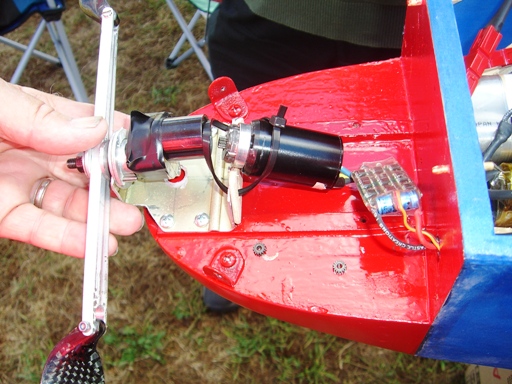
In Electric Texaco we get two flights of unlimited duration and the best one counts. Thermals are important to getting the best time should they be present and this year at Muncie they were mixed in with an abundant dose of the "blue sink", the spaces between the thermals where models descend as though on elevators, so you have to pick you time to fly. Eventually I decided to go and made a good takeoff and climbout till about seven minutes into the flight when the model started to descend. As it came lower I saw the prop was not turning so we landed and found the gearbox had come apart. The aft screw-in mount of the planetary gearbox to motor had come apart allowing two planet gears to fall out but the motor was jammed by the pinion gear into the planetary mesh. In the picture below the motor has been moved out of the jammed position. Look carefully and you will see the two loose planet gears just sitting on the motor deck; whew, lucky as we were able to reassemble the gearbox and Loctite the joint back together in an attempt to fly the second flight.
Now the challenge was to make the repair so it would all hold together under power. I had studied the Loctite manual when making the spur gear to planetary output shaft attachment a while ago. And I remembered that this strong Loctite requires 24 hours to fully cure at room temperature, however, it will set faster with the application of heat.
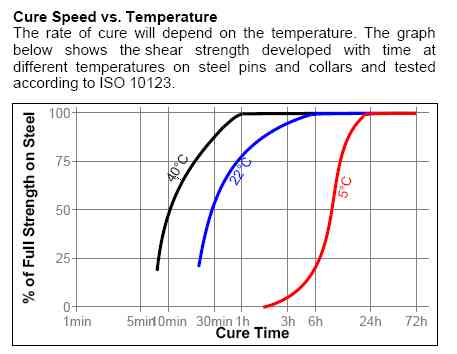
So this is what I did. I heated the joint area with a butane powered soldering iron, checking the temperature with an IR thermometer. I reached 110 degrees F during the cure. finally, not sure that it would hold I wrapped the joint with bond paper soaked in thin CA. I was sure this joint would hold. However, when we went out to fly the old pinion joint came loose and several attempts to make a repair with CA on the fighline failed. I figured that this joint, my old nemesis, came loose because of the heating! Oh well, one event down. Now on to the ignition powered Classic Texaco.
I removed the electric motor and installed the RJL replica Forster then mixed some fuel; 3 parts Coleman stove fuel and one part 60 weight Pennsoil. Next to hook up the ignition box battery and make the connections to the points, engine ground and spark plug and finally connect Marv Stern's ignition switch to the ESC or throttle channel on the radio. In a gesture from Heaven Marv Stern and Steve Boucher pitched their tent right next to us and our model preparation area, so once I thought everything was in place I asked Marv to check it. We fueled the engine and gave it a few flicks; no joy. "Hey Marv". Marv first ascertained that I had not read the manual, then proceeded to look for the red light on the circuit board that illuminates when things are right. They weren't, I had the throttle set in reverse as required for electric ESCs in Futaba radios. Marv's switch requires the opposite. We made the change and the ignition worked perfectly and the engine came to life.
Mike Myers photo
Unfortunately it would not continue to run and seemed to quit hot after about a minute. We tried a big 18 x 8 prop and then unloaded it with a 16 x 8 but with the same result. Well the last Forster we ran was the original formerly Don Bekins engine so we swapped it out and ran that with the same result. Ed Q from old SAM 76 and Steve Boucher, who was having problems with his Forster 99 powered Sailplane noticed that the exhaust was very smoky. Steve recommended that we try some of his 7:1 fuel and noted that Forster recommended 8:1. Steve offered us some fuel brewed 7:1 from Coleman and Klotz racing oil. It worked so we began the preparation for flying Classic Texaco. I had been reminding the "crew" that I must not forget to set the CG before flight as the configuration was very different to the electric one. First we had to weigh it and that was a challenge. I wish we had a picture. The Texaco weight of 12 pounds needed ballast in the form of both packs from the 32 cell NiCad battery although they were both mounted under the wing to get the right CG. Setting the CG was another chore as you don't balance this model on two fingers! Actually I laid on my back and lifted the model with a hand under each cabane member and eyeballed level. The subsequent flight seemed to suggest I got it a little too far back.
The first attempt was made with the 18 x 8 prop. It started just fine and we filled the tank and went for it. It taxied out and slowly gained speed for a sort of takeoff. It just did not have enough thrust for a climb out so I set it down for a landed off field score. This video of the attempt was made by Thomas Ryan.
I thought the smaller prop would help although it also had an eight inch pitch and I would have preferred a six inch one, but we went for it. This time it did climb out although very slowly but it steadily gained altitude until the motor quit after about six minutes or so. Here is the Tom Ryan movie of the flight.
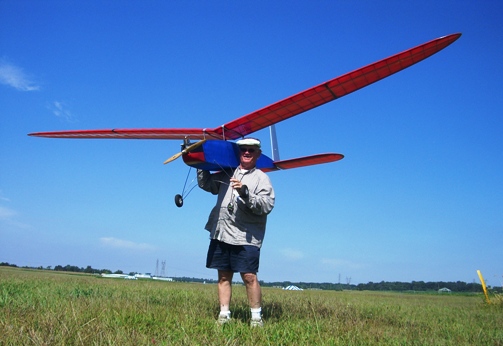
I glided down to the landing patch but thought it was a little too close to the orange pipes in the middle of the field, so I maneuvered away from them and was astonished by landing in the bean field; flight two off the field. But otherwise a magnificent first ignition flight of 7:11. I was happy with the result Here is Chuck carrying it back from the beans, the orange poles on the right!
Has it been a successful project? You bet, in every way, and I expect with the usual sorting out it will be competitive in both classes. Now how can I get this to Europe for the Euro SAM RC Texaco event, I have the diesel Irvine, that should work for it.
Well it is now mid September 2009 and again I am working towards the SAM Champs with the Giant. This time I will fly it in some additional classes and I hope the problems of 2008 are behind me. Please go to the next page to begin this chapter.
Page 1 / Page 2 / Page 3 / Page 4 / Page 5 / Page 6 / Page 7 /Page 8