In Italian; http://www.dhaerotech.com/1400ss-it.htm please excuse the Google Translation!
26 August 2012
Two weeks till the Champs and I am still building.
This particular project started last year as we planned or at least held open our options to compete in the Euro SAM RC Champs in Slovakia. In the event we didn't make it but with next year possible I have moved into the build stage.
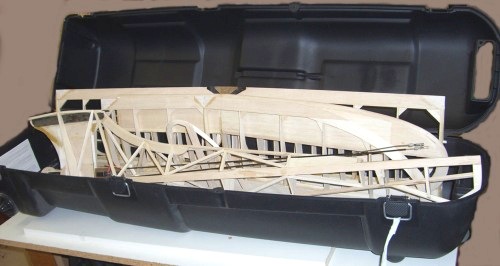
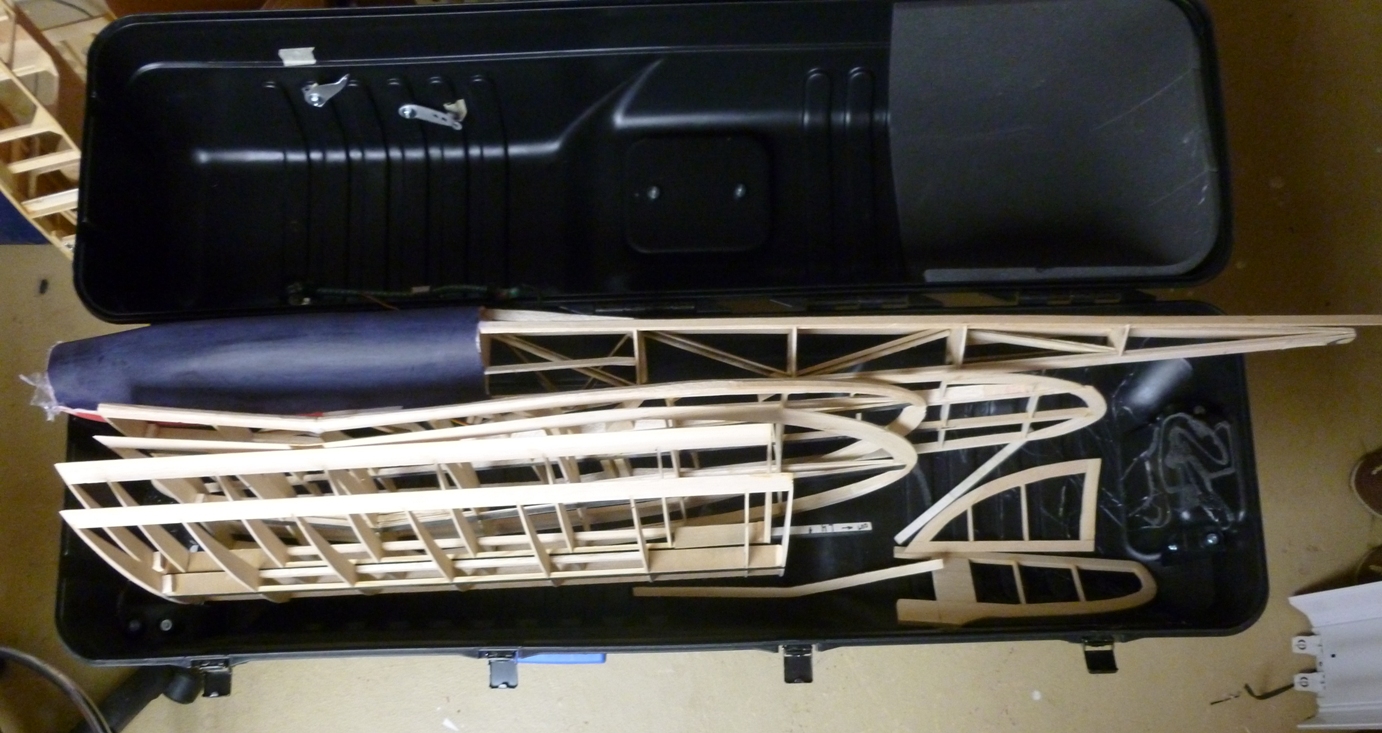
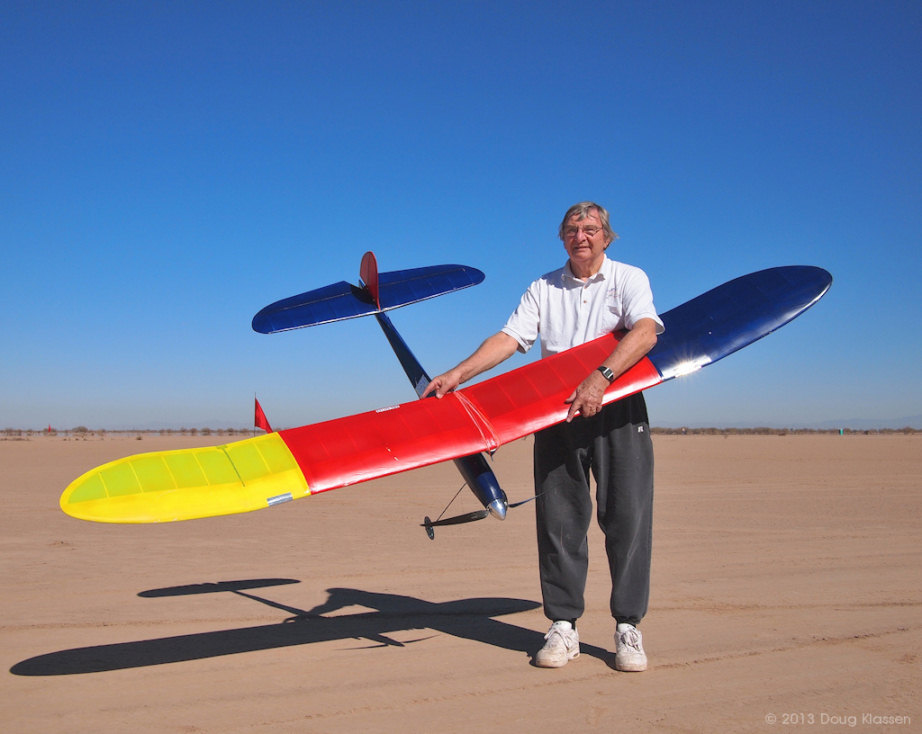
The plan was and is to fly one model in the OTMR, Old Timer Ignition event with a McCoy 60 series 20 ignition engine, then in the Limited Motor Run electric class and finally the Texaco class with one of my diesels. I have flown my 2006 1100 sq inch SS in all kinds of events over the last eight years and it has been very successful. But I need a bigger plane for the Texaco event so I bought a new hard sided golf bag shipping container that is somewhat bigger than the one I used as the template for the prior model. The 1100 sq inch model has an 11 inch chord and 108 inch span. It fitted in the old golf bag with a removable tail and three piece wing. Here is the 2006 model in its golf bag/container.
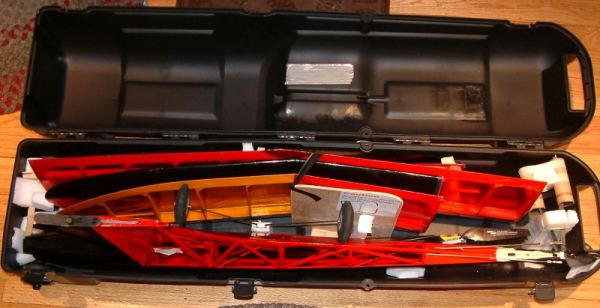
The new golf bag allows me to make a wing with a chord of up to 13.5 inches, but the other parts then get hard to fit so I decided to make it with a 12.5 inch chord resulting in a 118 inch wing span and a fuselage that is a few inches too long to fit in one piece. Fortunately the separation of the extra piece occurs just behind the horizontal tail mounting so is essentially a fairing, although it does include the lower fin which is also the tail skid! Have to watch the design and fixing of this part.
The wings are in four pieces with graphite/balsa and ply joiners per all my recent experience.
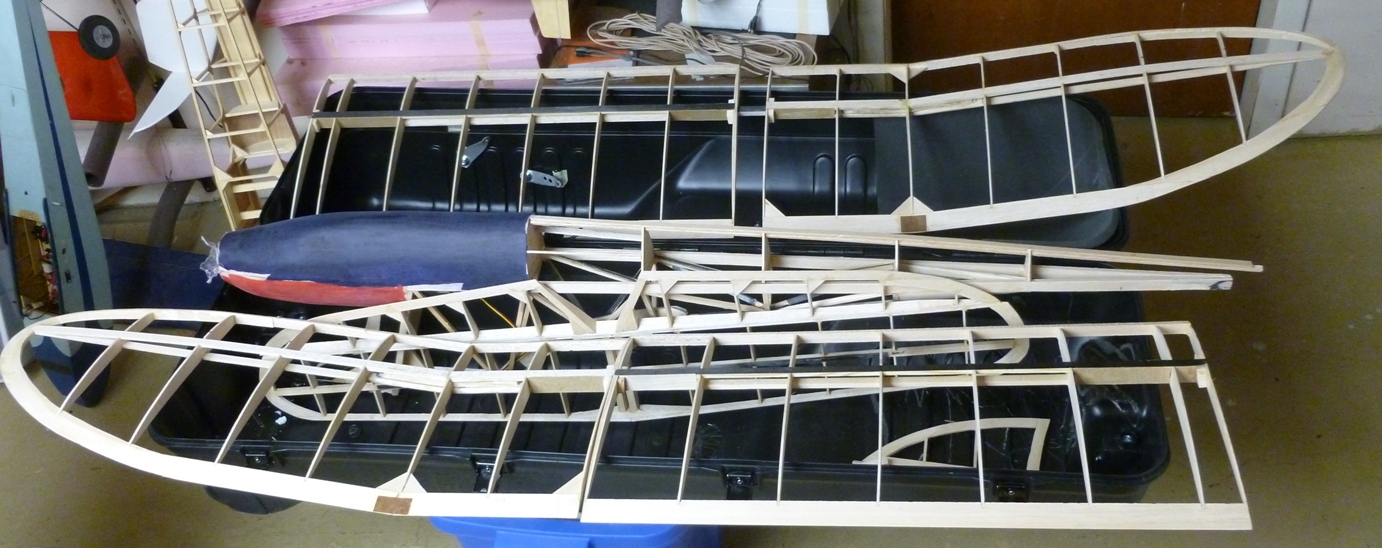
So far I have framed up the wings and tail surfaces and set them aside while building the fuselage. Here are the parts as they are now sitting in the box.
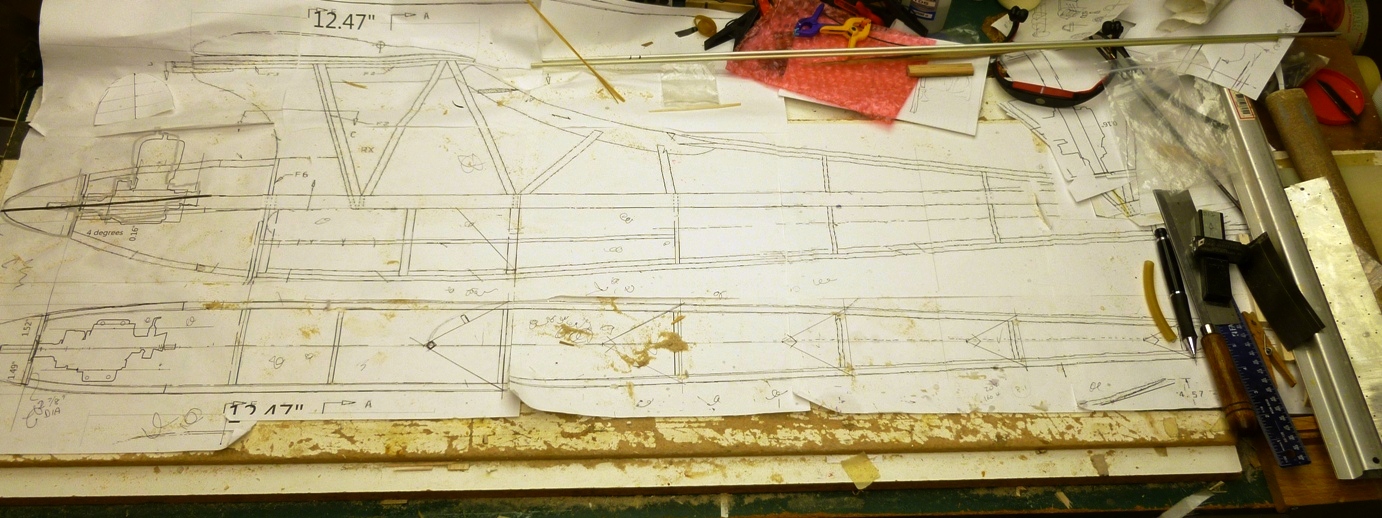
Many years ago Tom Hunt gave me copies of all his electric LMR Old Timer plans including the Stardust Special. Tom worked with Don Broggini the designer and I believe was responsible for getting the model accepted by SAM. I have scanned these plans so I can make build plans of any size. My practice is to use Corel Draw to size the parts then print just the piece I need on strips of paper, actually old fan-fold paper for which I have defined custom paper sizes for my Epson Photo 1200 printer. I can print any number of sheets as required for the part I am building. A useful feature in Corel Draw is in the print layout. If you select Tile Printing in the print options you will see you plan depicted with as many custom sheets as required for the whole thing. the trick is to click and select the plan and drag it so the part you want best fits on the sheet, then with a right mouse click you select "Print this sheet now" and hey presto, a build plan. BTW, I don't save my plans as objet d'art, I build right on them and don't worry about gluing the plan to the part. Here is the plan from which I built the fuselage.
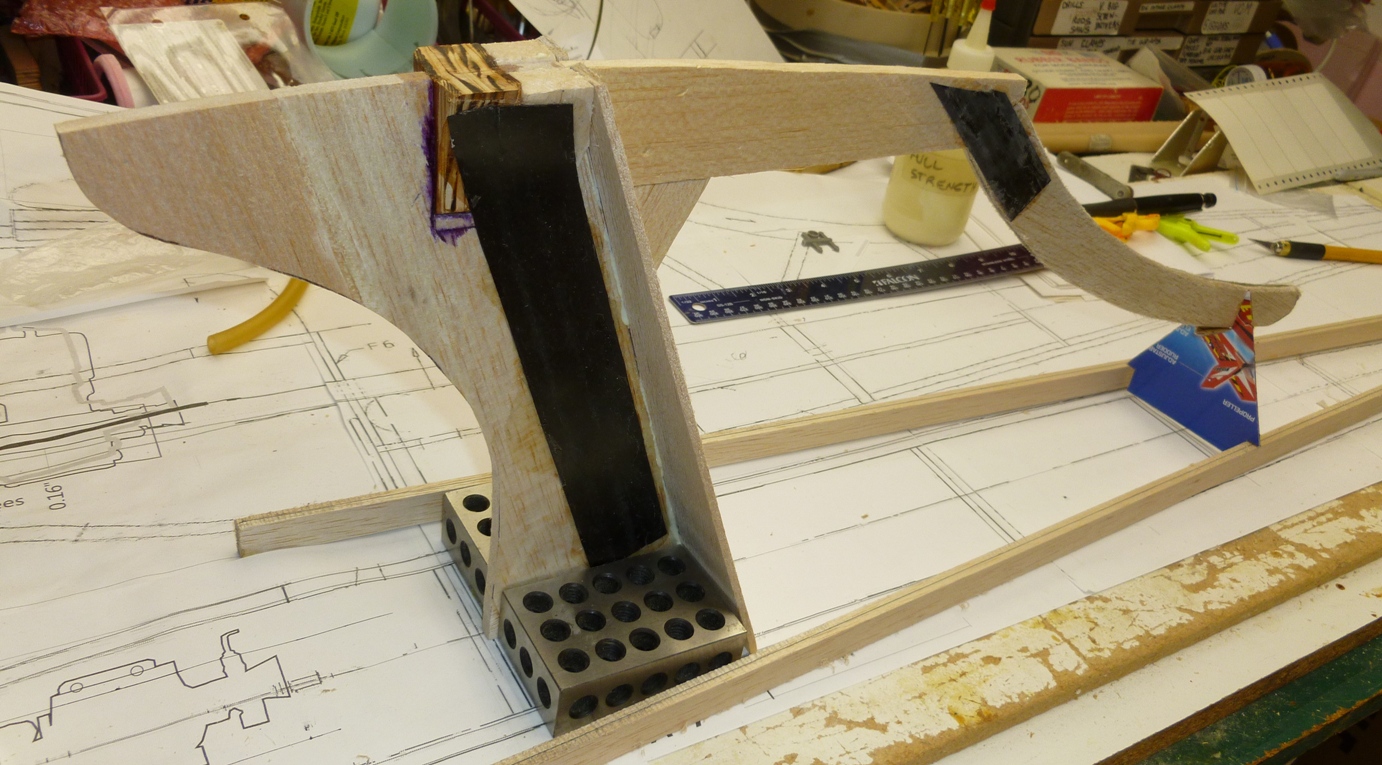
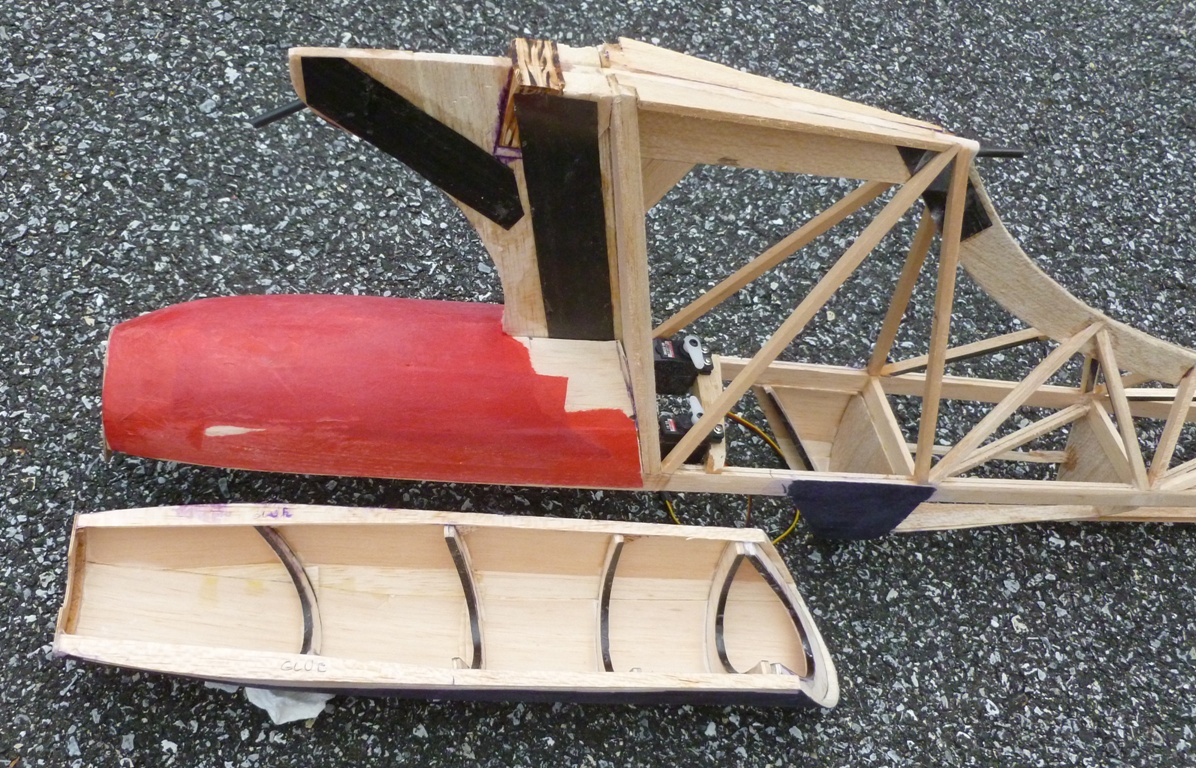
Since the loads and vibration expected on this model far exceed anything the designer had in mind I have used a fair amount of graphite to stiffen and strengthen the structure at critical points. I have also included graphite in the aft fuselage structure as these models tend to have rather soft back ends. Here is the first piece of pylon structure. the swaback part is laminated to a graphite layer as the grain does not conform to the shape and I have failed this part in the past. Love those 1,2,3 blocks for layouts and true alignment (not that I maintain that for long...) Note the graphite layer in the laminated crutch parts laying alongside the plan.
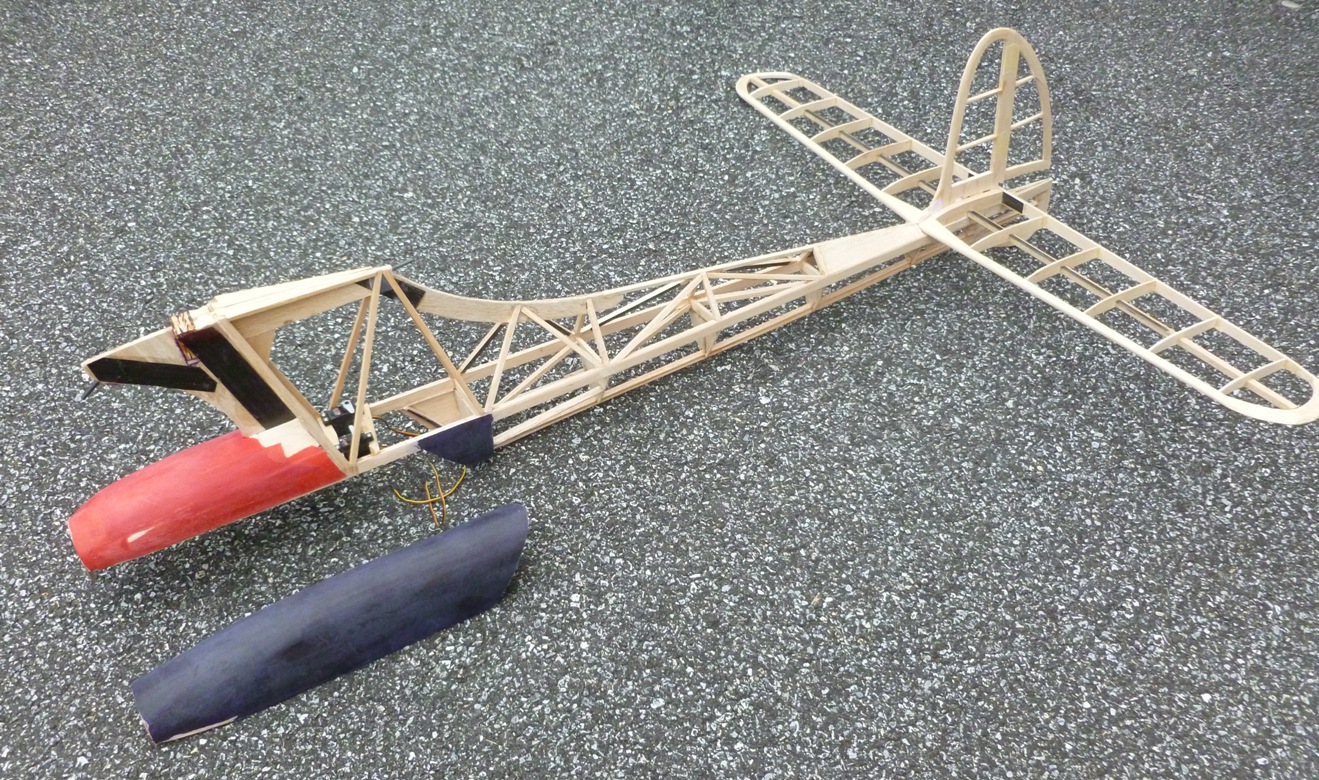
Here is the airframe as of last night. The forward fuselage was sheeted with large pieces of soft 1/16 and 3/32 balsa wetted and hand shaped before attaching the the frame with CA. This approach goes much faster than a hundred 1/4 x 1/8 strips. I finish it off by filling blemishes with lightweight spackling, sanding and covering with many layers of cheap tissue and polyurethane water based sanding sealer. Once this is approaching a satisfactory shape I separate the cowl along the parting line which was lightly CA'd to the mating part and cutting the aft end.
The sheeted front end before the cut;
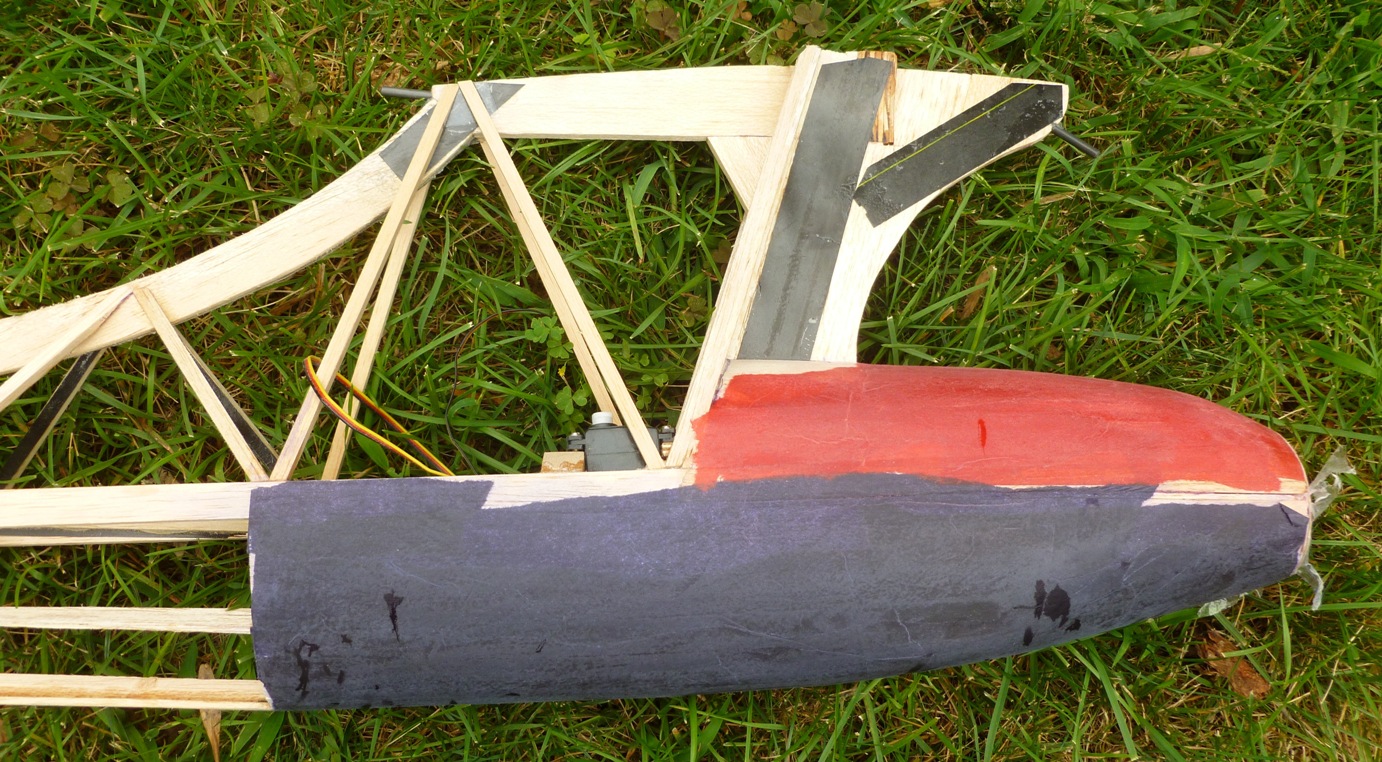
The frames for the cowl are made from two layers of 3/32 balsa, cross grained and cut to shape. I then CA the graphite cap strips to the outside, then cut out the middle shape and add the inner graphite cap strip; light and strong. Note the hardwood ply block in the pylon to take a long screw which will hold the aluminum wing mount.
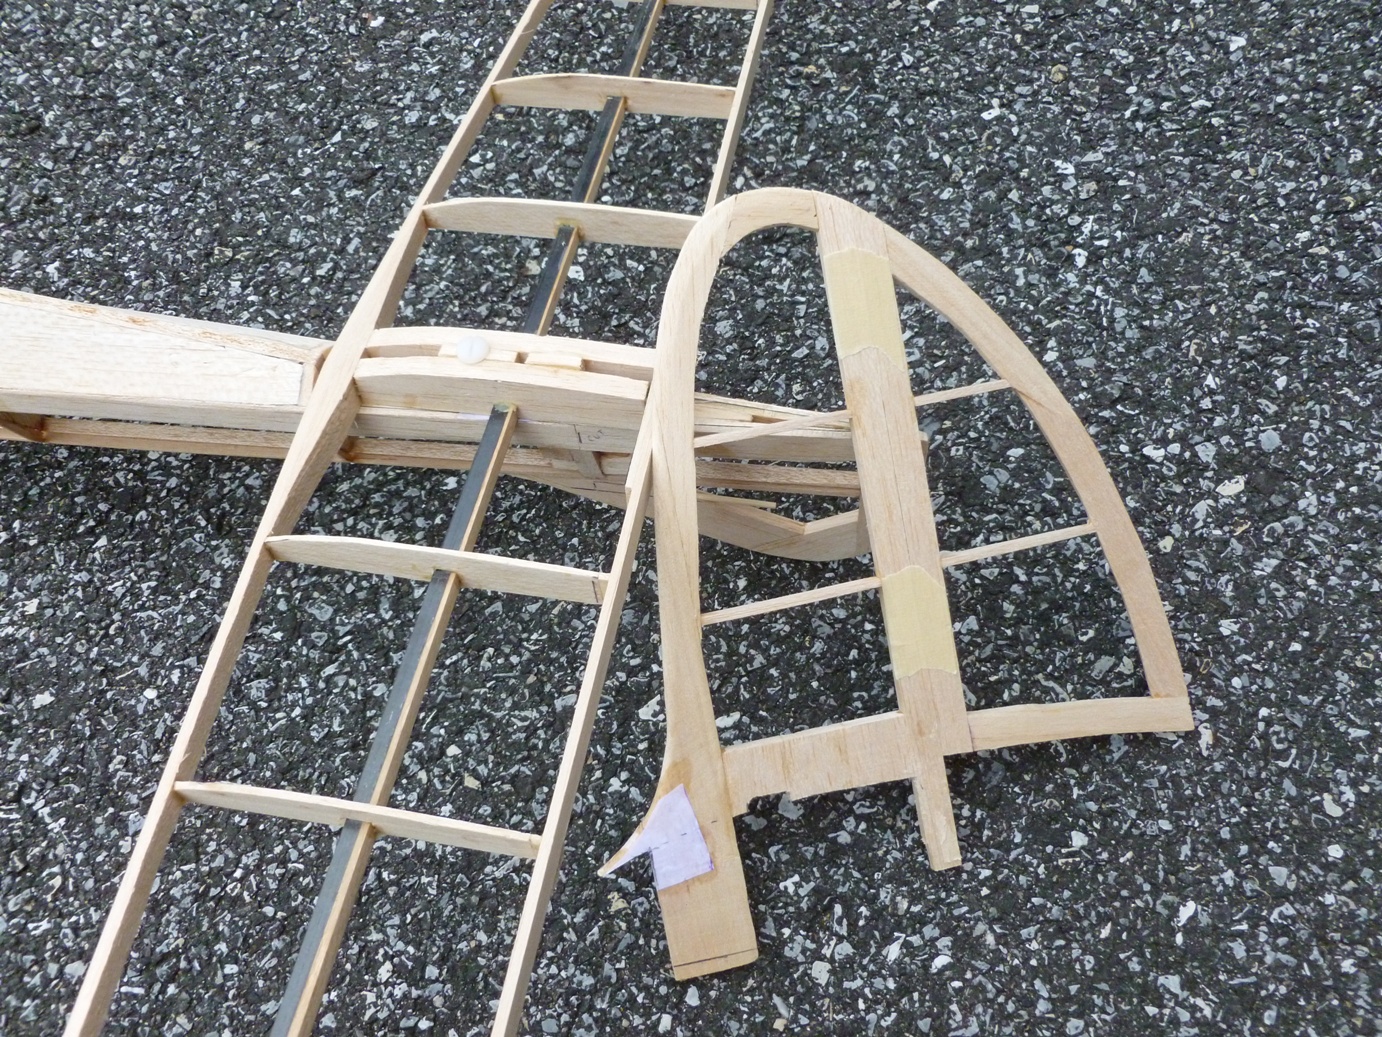
Here is my method of attaching removable tails. One screw to attach and elongated fin spars for alignment. Works great and easy to attach and disassemble. Note the single 1/4 x 20 Nylon screw.

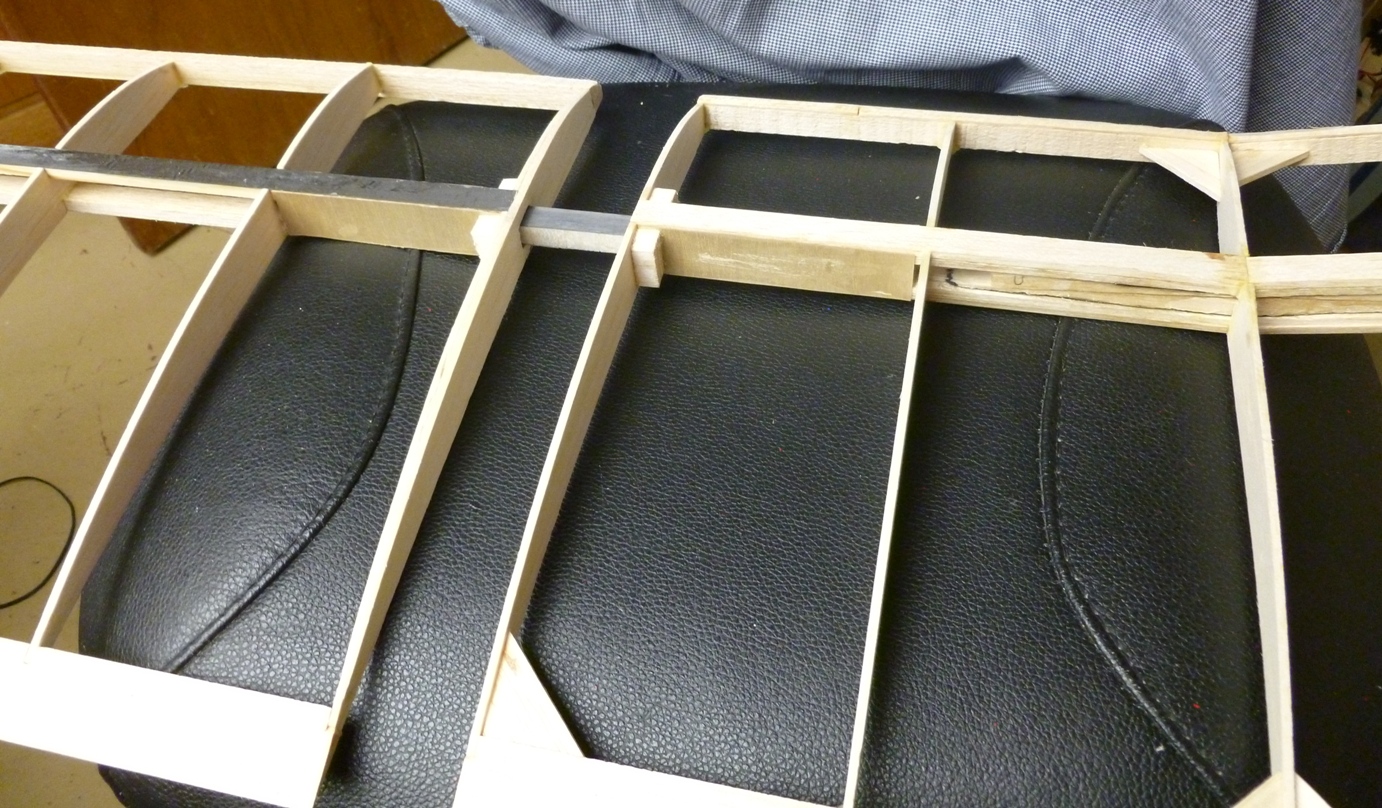
This picture shows a wing joint. Note the graphite caps on the joiner. Also the fixed dihedral joint was made with the shear web missing so I could glue graphite cap strips to the inside of the spars, bridging the joint. the shear webs were added afterwards. Stresses in shear webs are really low, especially this far out on the wing but I use balsa thicker than necessary for plain shear strength so as to provide margin for the glue joint between the shear web and graphite cap. The inboard spars have graphite reinforcement as you can see here.
Well, back to the shop.
August 27th
I posted the above blog to the SAM Talks chat group and received the following reply from Peter (Condo) Smith, a noted SAM flyer from Australia, SAM 1788.
--- In SAMTalk_Forum@yahoogroups.com, peter smith <peter_condo@...> wrote:
> very nice building , I would never be game to fly it though . Compared to what u have as spars in my 100inch McCoy powered one ,you scare me with your spars . Mine has 1/2 wide spruce by 1/4inch thick topped with carbon fibre 1/4 thick by 1/2 inch wide then balsa then carbon then spruce ,all put in a mould and cured. The spar was once piece from tip to tip /from the poly joint out I tapered the spar to 1/8 inch at the tip , then put vertical grain each side and glued ribs front and back ,then capped stripped the top and bottom to hold it all together . LE top and bottom was 1/16 sheet .That wing saw out 3 fuzz and 2 broken tailplanes before it finally destroyed when a Nelson 45 failed to shut down at 25 seconds.
Here is my reply;
Peter, you got me worrying there for a minute so I had a look at the spars. First of all the wings in the picture are only framed up and incomplete. I will add the shear webs and LE sheeting and also carbon strip on the top and bottom of the key ribs, like at the joint ends.
As for the spars, the top spar is indeed 1/2 x 1/4 spruce with what looks like three layers, .021 inches of aero grade pre-preg graphite, and I did make it in a press, or at least clamped between two rigid bars. The lower is hard balsa, the same size but probably fewer layers of graphite, but also applied in a press.
I don't think I ran the numbers but it should be ok. That said I have not flown one with a high power ignition engine, but I have flown the small model in the Euros pulling thrust about the same as the McCoy; scary climb! I was pulling over 100 amps on a two cell LiPo with a prop about 20 inches diameter ~ about 700 watts or just less than one horsepower. the late Don Blackburn said the McCoy puts out about 1 1/2 horsepower on a 12 inch prop, so the thrust would be about the same.
Interesting and rather scary thing is with rudder only the yaw required to achieve torque balance way weird. The thing climbed in a massive crab attitude.
But maybe I will run the numbers on the spar now you have me thinking about it. There is still time for a few more layers of graphite under the LE planking should it be needed.
You may like to see the Boehle Giant spar analysis in my blog; http://dhaerotech.com/giantblog2.htm The test is on page 3.
As for your earlier comment on the Stardust Special tuck problem. I discovered that in my first one back in 2003 when I also discovered the torsional weakness or rather softness in the multi-spar wing. The tuck has not been a problem for some years in my subsequent models until last January at Eloy. My 1100 sq inch model was climbing in LMR with the modestly powered Aveox motor and a current rule LiPo battery ~ probably a 1300 mah three-cell. Approaching the top of the climb it suddenly upset and went into a vertical dive from which I wasn't able to recover. Recover heck, it just didn't respond to anything I did until I must have given it full rudder whereupon it righted itself and entered that magnificent glide at about 100 ft.
In hindsight I probably didn't check the CG and it was probably behind the 62% limit I normally use. Darn LiPos, they are just not heavy enough.
Dave
Well, now I had better check the numbers for spar strength!
8 July 2013
The least said the better about the Champs. How many times must you learn the fundamental lessons? Thouroughly test before you go to a competition!
First problem in LMR, the model fluttered on the glide when trying to get it in trim! How can that be? Then I couldn't get it in trim and checked the CG again only to find it way behind the desired point. How could that happen? I had been so careful in maintaining a weight and balance measurement and analysis, even to the point of making a carefully fitted molded lead weight to fit between the servos aft of the pylon. So I removed the weight and added it forward, but nothing to do about the flutter but fly carefully; to no avail!
I rebuilt the wing on my return home, only to find I had omitted the shear webs in one wing half! How could that be?
Then on to Eloy for the 2013 meet where I won LMR but managed a prop strike that popped the gearbox pinion from the shaft in Electric Texaco, so that was the end of that event.
Subsequently did the same at the John Pond Memorial contest at Taft, but fixed it with CA and did an hour flight for grins.
Is this model snake bit? Hope not as I plan to fly it in the 2013 Champs on the El Dorado dry lake this fall. Although the model is in SoCal and I am in Pennsylvania and I won't have much time to check things out before the Champs..... sound familiar?
2013 Champs
In Electric Texaco I found I ran out of power to climb at about 14 minutes against a projected of about 30 minutes. What can it be? The altitude on the El Dorado dry lake? No, subsequent analysis indicated the flaw is in my old rules used for power selection in E Texaco. I always picked a power system that would achieve a minimum rate of climb of 200 ft/minute. Experience has shown that anything less will not let you climb out of the turbulent ground layer. (search and read the story of Paul McCredy's cross English Channel man powered flight. The pilot gave up half way across but to quit and have the power boat tow him the rest of the way it was necessary for him to momentarily gain altitude so they could snag the towline. When he did so he found the smoother air at a bit higher altitude allowed flight with lower power. So he successfully continued for the record.)
Now I rely on MotoCalc for the performance analysis and selection of motor/gearbox/propeller/cell number to achieve the necessary performance. It dawned on my that MotoCalc uses the nominal LiPo cell voltage of 3.7 volts in the analysis. But I fly to cell exhaustion at 3.0 volts, hence the performance after a half used batter deminishes to the point the model can no longer climb. So obviously now I allow a greater margin and the performance I achieve more closely matches the MotoCalc analysis.
But on to LMR with the different motor/prop. Another disaster; Nice climbout but too close to the bright desert sun. So I asked my flying buddy and timer to pull my hat down a bit. Well he did, but a lot and I lost sight of the model. When I managed to regain vision it was not one I wanted. The model was in a vertical dive and proceeded to shed the fin and fold the wings! Model bits not in good shape!
2014 Champs
Well, fix it I did and again flew in both Texaco and LMR. In Texaco I placed third to my hero and winner Jack Hiner and perrenial great flyer Glen Poole.
LMR was another saga. The well engineered LMR, even a big one linke the 1400 sq inch Stardust Special will go almost out of sight in the 90 second climb and the still air time should be well over 15 minutes against a 10 minute max. So I install a propeller that still gives me a great margin in the initial flights but allwos the motor etc. to operate at lower current levels and use only about 70% of the battery energy.
Well, I easily made the two maxes to qualify for the flyoff. But just as we were to fly it was anounce that the climb time would be reduced to 60 seconds. Now this put me at a significant disadvantage because now I would only use about 50% of the battery energy and obviously significantly reduced climb altitude. If we had been given notice of this change I should have installed a bigger propeller which would allow me to climb very much higher while using most of the battery energy; but we weren't given notice, so I flew with the smaller propeller and finished way off the pace.
2015 Southwest Regionals at Eloy Az.
"Once more unto the breach dear freinds, once more or close the wall up with our English dead" well, it felt like that in the end as at the top of climb in the LMR event I lost sight and orientation. The next thing I saw was the dreaded vertical into the desert! Examination of the wreckage showed the center wing joiner had failed; well, not broken but folded into a V.
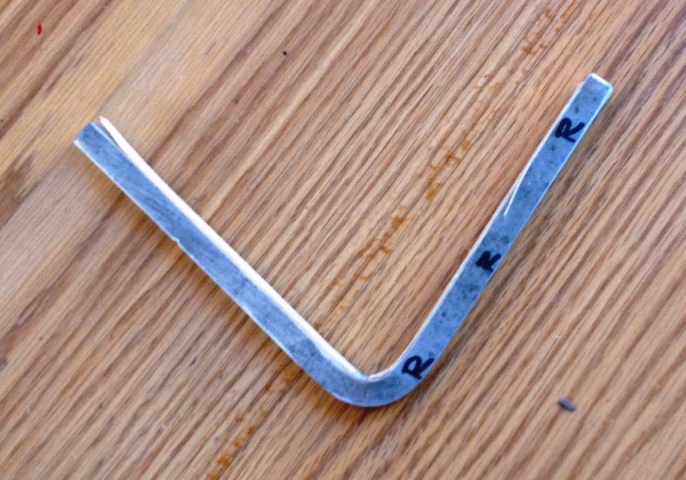
Yikes, how can this be? I as an engineer I compulsively analyze the strength of my wing spars and joiners. This one is a solid 7/16 x 3/8 inch 6061 aluminum part. Obviously it is strong enough, isn't it? Turns out that not only is it not strong enough I had just assumed it was; no analysis.
Oh well, I said the model was "snake bit" from the beginning.
But wait, it is April 2015 and I just decided to go to the Euro SAM RC Champs to be held in the Czech Republic and need a model. What to do? Answer, build another big Stardust Special, but this time back to the 108 sq inch size to fit in the golf bag. But that is another story; great time in Europe though.
Dave